User 2 - Effective Effects Set Up
I am working primarily with the Launchpad and my Yamaha DXG-505 MIDI keyboard to produce.
I have a firm grasp on 'session', 'user 1', and a fairly efficient working knowledge of 'mixer' modes.
However, for a long while, the purpose of "USER 2" mode had escaped me completely.
Before, I used to think that 'user 2' was controlled solely through the use of Automap, but now, I have discovered that is not the case. (Automap is somewhat confusing, but I'll save that for a later post).
Well, as it turns out, in order to make 'user 2' do anything at all, there has to be MIDI MAPPING for it within Ableton Live. So let's talk about effects and MIDI mapping.
Setting up an effect for your MIDI instrument -
Before we can even consider using 'user 2' to control effects and effects parameters, we first have to have some effects to control! You will want to select an effect from the 'MIDI Effects' or 'Audio Effects' in your browser window <CMD+OPT+B>. In the example below, I'm going to use Ableton's 'Ping-Pong Delay' on a drum rack. Simply bring up the clip details at the bottom of the screen by clicking the little triangle on the bottom right of the window or <CMD+OPT+L>. Next, bring up the 'effects' tab, located directly to the left of that triangle. Now, find the effect you want, click the folder and simply drag it to that area.
Hooray! We now have an effect on our drum rack. But how do we turn it off and on without having to click the computer's mouse eight hundred thousand times? WHAT ABOUT THE LAUNCHPAD?! Ok. That's 'User 2' mode.
"But 'User 2' mode doesn't do anything!"
"That's because you need to use MIDI Mapping"
...oh.
MIDI Mapping in Ableton Live -
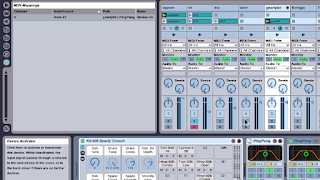
In order to bring up the MIDI Map in Ableton, you must first hover over a device, right click, and then select 'Edit MIDI Map'. Alternatively, you can bring yourself to the MIDI Map Screen by pressing <CMD+M>. The MIDI Map Screen is pictured below. Take a look at it to make sure you're in the right place. You'll see items highlighted in blue.
effects to different buttons on your launchpad,
it's ideal to be in 'user 2' mode right off the bat.
This is important because selecting 'user 2'
on your launchpad while in MIDI Map mode,
will make pressing "user 2" on your lanchpad
activate whatever you may have mapped
'user 2' as, and we will want to keep 'user 2'
as 'user 2'...That's a lot of 'user 2' for one paragraph. 'user 2, user 2, user 2'.
OK! So, great. We got the MIDI Map open. Now what?
Effect Device/Parameter / on/off -
It's so close I can taste it...and it kind of tastes like steel. Not...terrible, I guess...
So now that we have our effect tied to an instrument rack we can easily program 'user 2' to control different aspects of that effect. A good place to start is with the 'Device On' button.
 In the upper left hand corner of the effect device (Ping Pong Delay in this example), there is a wee little green switch that will turn the effect on or off. While in 'Edit MIDI Map' mode, click that button and then press the most lower left pad on the Launchpad (while in 'User 2' mode). On the left, where the Browser window is located, you will see the chart for the MIDI map automatically add "Device on/off" with its new respective MIDI key. Voila! Now, that 'User 2' pad will switch the delay on and off!
Another fun feature of setting up 'User 2' mode with the Launchpad is gaining the ability to tweak effects manually from 0-100%, similarly to the way you would with a knob or fader on a traditional synthesizer. This kind of function can be achieved in the same manner as mapping 'device on/off' with 'Edit MIDI Map'. The main difference is that, you will have to press two pads simultaneously when mapping.
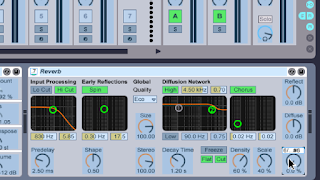
Let's use another example for this, shall we? Let's take the audio effect 'reverb' and apply it to square wave instrument rack. Okey dokey, no problem.
- First, bring up clip view <CMD+OPT+L>.
- Next, we'll locate 'Reverb' in the 'Audio Effects' folder of our browser.
- Go ahead and draaaaggg it on down to the clip view. Then, with 'User 2' selected on your Launchpad, open up 'Edit MIDI Map' in Ableton Live <CMD+M>.
- Assign a pad on the bottom row to turn the device on or off.
- Finally, move your mouse cursor over to the "Dry/Wet" knob on the 'Reverb' Device. Click it, and when selecting a pad to map, choose the pad directly above the "on/off" pad and the pad on the top of that column simultaneously. This should make each pad in that row (with the exception of the on/off pad) go up or down in wetness by about ~10%.

You may find that you need to 'Invert the range' to make the fader action more natural.
Conclusion -
Well, I think that about covers what I learned last night with 'User 2'. I have a lot to learn about 'User 2' mode and will be posting daily-ish regarding my discoveries.
I want to know what kinds of tips and tricks YOU have learned in 'User 2' mode on Ableton's Launchpad! Please comment or send messages and let's master 'User 2' together!
I want to know what kinds of tips and tricks YOU have learned in 'User 2' mode on Ableton's Launchpad! Please comment or send messages and let's master 'User 2' together!
Thanks for checking out my post! Please feel free to ask any questions you might have and check back for more!
Christopher S.


No comments:
Post a Comment